
Notice
Recent Posts
Recent Comments
Link
| 일 | 월 | 화 | 수 | 목 | 금 | 토 |
|---|---|---|---|---|---|---|
| 1 | 2 | 3 | ||||
| 4 | 5 | 6 | 7 | 8 | 9 | 10 |
| 11 | 12 | 13 | 14 | 15 | 16 | 17 |
| 18 | 19 | 20 | 21 | 22 | 23 | 24 |
| 25 | 26 | 27 | 28 | 29 | 30 | 31 |
Tags
- 강아지 더위
- 반려견
- 반려견 종류
- 국비지원 예습
- 쿠팡매크로
- 반려견 유기농
- 자동화봇
- 반려견 홀리스틱
- 닥스훈트
- 강아지 홀리스틱
- 티켓팅메크로
- 티켓팅매크로
- 홀리스틱 유기농
- 강아지 열사병
- 서울대입구 맛집
- 샤로수길 맛집
- 강아지종류
- 반려견 사료등급
- 부산 맛집
- 신포동 맛집
- 반려견 유기농 사료
- 강아지 유기농 사료
- 강아지 유기농
- 반려견 더위
- 쿠팡메크로
- 동인천 맛집
- 반려견 열사병
- 샤로수길 데이트
- 강아지 종류
- 강아지
Archives
- Today
- Total
심심한잉여의 잡동사니
[파이널 프로젝트] 네이버 검색 API JSON으로 받아 파싱 본문
반응형
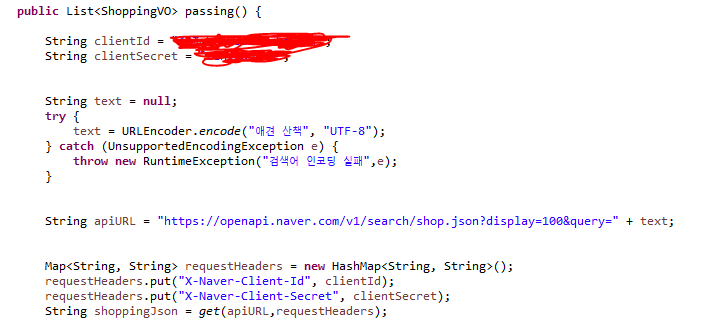
원하는 json문자열을 받기위해
GET방식의 URL을 만져서 원하는 요청값으로 만든다.
본인은 100개의 항복을 애견 산책 검색어가 박힌 쇼핑검색으로 했다.
List<ShoppingVO> resultList = new ArrayList<ShoppingVO>();
String[] passingSplit = shoppingJson.split("\"items\": \\["); // 앞 잉여데이터 삭제
passingSplit = passingSplit[1].split("\\]\\}"); // 뒤 잉여데이터 삭제
passingSplit = passingSplit[0].split("}"); // 각 아이템별로 데이터 나누기
for (int i = 0; i < passingSplit.length; i++) {
passingSplit[i] = passingSplit[i].replace(",{", "").replace("{", ""); // 괄호 삭제
}
String[][] rowDataArr = new String[passingSplit.length][]; // ROW데이터를 담기위한 2차원 배열
for (int i = 0; i < passingSplit.length; i++) {
rowDataArr[i] = passingSplit[i].split("\",\""); // 따움표 삭제
for (int j = 0; j < rowDataArr[i].length; j++) {
rowDataArr[i][j] = rowDataArr[i][j].replaceAll("<b>", "").replaceAll("</b>", "") // DB에 담을 값에서 필요 없는
// HTML 삭제
.replaceAll(""", "").strip(); // 필요없는 코드 및 앞 뒤 공백 삭제
}
}
List<Map<String, String>> jsonList = new ArrayList<Map<String, String>>(); // ROW데이터로 분리될 객체MAP을 담을 LIST
for (int i = 0; i < rowDataArr.length; i++) {
Map<String, String> shoppingMap = new HashMap<String, String>(); // ROW데이터를 분리할 맵
for (int j = 0; j < rowDataArr[i].length; j++) {
String[] rowDataInfo = rowDataArr[i][j].split("\":"); // :로만 나누면 엉뚱하게 나눠지는 내용도 있어 ": 로 스플릿
shoppingMap.put(rowDataInfo[0].replaceAll("\"", "").strip(), rowDataInfo[1].replaceAll("\"", "").strip()); // 이후
// 값에서
// 따움표
// 삭제
}
jsonList.add(shoppingMap); // 아이템별로 MAP값 입력 for문이 돌면서 다시 map을 생성하니 참조ID가 달라서 중복 안됨
}
for (int i = 0; i < jsonList.size(); i++) {
String title = jsonList.get(i).get("title");
String link = jsonList.get(i).get("link").replaceAll("gate.nhn\\?id\\=", "catalog/");
String image = jsonList.get(i).get("image");
String lprice = jsonList.get(i).get("lprice");
String hprice = jsonList.get(i).get("hprice");
String mallName = jsonList.get(i).get("mallName");
String productId = jsonList.get(i).get("productId");
String productType = jsonList.get(i).get("productType");
String maker = jsonList.get(i).get("maker");
String brand = jsonList.get(i).get("brand");
String category1 = jsonList.get(i).get("category1");
String category2 = jsonList.get(i).get("category2");
String category3 = jsonList.get(i).get("category3");
String category4 = jsonList.get(i).get("category4");
ShoppingVO svo = new ShoppingVO(title, link, image, lprice, hprice, mallName, productId, productType, maker, brand, category1, category2, category3, category4);
resultList.add(svo);
}
return resultList;받은 JSON문자열을 가지고 위 코드와 같이 파싱을 했다.
String link = jsonList.get(i).get("link").replaceAll("gate.nhn\\?id\\=", "catalog/");링크에 맞는 url이 살짝 마음에 들지않아 바로 카탈로그로 갈 수 있도록 살짝 수정하였다.

위 이미지가 기존에 보내지던 링크이며 저 부분만 수정하여

위 이미지처럼 보이도록 했다.
ID값이 동일하여 문제가 없었다.
파싱은 여기서 마치고
@RequestMapping("/shop/list")
	public String shop(Model model) {
		try {
			model.addAttribute("shopList",shopList);

		} catch (Exception e) {
			e.printStackTrace();
		}

		return "/shop/list";
	}
위 코드와 같이 맵핑을 해준 후 JSP로 넘겼다.
<%@ page language="java" contentType="text/html; charset=UTF-8"
    pageEncoding="UTF-8"%>
<%@ taglib uri="http://java.sun.com/jsp/jstl/core" prefix="c"%>
<%@ taglib uri="http://java.sun.com/jsp/jstl/fmt" prefix="fmt"%>
<%@ taglib uri="http://java.sun.com/jsp/jstl/functions" prefix="fn"%>

<c:set var="path" value="${pageContext.request.contextPath}"/>

<!DOCTYPE html>
<html>
<head>
<meta charset="UTF-8">
<title>Insert title here</title>
</head>
<body>
	<c:forEach var="item" items="${shopList}">
	<img alt="썸네일" src="${item.image}" height="300px" width="300px">
	<p><a href="${item.link}">상품명 : ${item.title}</a></p>
	<p>링크 : ${item.link}</p>
	<p>최저가 : ${item.lprice}</p>
	<p>카테고리 1 : ${item.category1}</p>
	<p>카테고리 2 : ${item.category2}</p>
	<p>카테고리 3 : ${item.category3}</p>
	<p>카테고리 4 : ${item.category4}</p>

	</c:forEach>
</body>
</html>
view부분은 딱 필요한 정보만 보이도록 하였으며
JSTL을 사용하여 반복문을 실행했다.

해당 view를 실행하면 위 이미지와 같으며 정보가 정상적으로 옮겨진 모습을 볼 수 있다.
반응형
'코딩일기 > 파이널프로젝트' 카테고리의 다른 글
| [JSP/JavaScript&HTML] 업로드하는 파일 미리보기(썸네일) 기능 (0) | 2022.02.21 |
|---|---|
| [Oracle]특정 기간, 날짜 조건 조회 쿼리 (0) | 2022.02.06 |
| [AWS] EC2에 도커 사용환경 구축하기 (0) | 2022.02.03 |
| [파이널 프로젝트] 카카오맵 API 폴리라인 좌표 서버로 보내기 - 1 (0) | 2022.01.19 |
'코딩일기/파이널프로젝트' Related Articles
more

